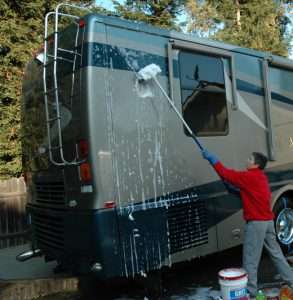
After a long winter stored in a super-secret location – outdoors in a field on my relative’s property – my camper is looking a little worse for the wear. Dirt, black streaks and tiny dark spots that can only be mold are evident all over the outside of the RV.

It’s time to clean the camper. A free Saturday, a favorable weather forecast and assorted equipment and products are all that’s needed for a sparkling clean camper.
It’s during this cleaning that I get a more thorough inspection of any repairs that might be needed.
Products & Equipment
-
Thetford Rubber Roof Cleaner
-
Thetford Awning Cleaner
-
Thetford Black Streak Remover
-
Thetford Wash and Wax
-
Assorted brushes with soft and stiff bristles, sponges, bucket and water. We use a 13-piece car wash kit with a long handled pole, a variety of hard and soft bristle brushes and spray nozzles.
Washing the Exterior
First things first, I spray down the roof and walls to knock the dirt clumps, leaves and seed buds off the roof and walls.
I subscribe to the top-down theory of cleaning, so we’ll start with the roof. Using the long-handled soft-bristled brush and a spray bottle of Thetford Rubber Roof Cleaner, it’s up the ladder I go. I only clean about a quarter of the roof at a time before I have to move the ladder, but the dirt comes off relatively easily. Having the car wash brush makes it nice because the garden hose  attaches to the handle so I’m constantly having fresh water on the brush. Once the entire roof is cleaned, then I switch to the spray nozzle and thoroughly rinse the soap off.
Then it’s onto the walls. Here I switch to good old fashioned elbow grease. I fill a bucket with water and the appropriate amount of diluted Thetford Wash and Wax. A large sponge is usually all that’s needed, but I’ll switch to a stiff-bristled brush and Thetford’s Black Streak Remover whenever a stubborn stain presents itself. I’ve found this to be the best course of action for the little mold spots, and then go back over it again with the Wash and Wax. I’ll do one side at a time, starting with the top and working my way down. Again, a final rinse ensures all the soap is washed off. If you are washing a motorhome or larger fifth wheel a fiberglass pole & soft multi-use brush make it easier to get those “hard to reach” places.
Cleaning the awning used to be difficult, but a little trick I discovered makes it much easier. I used to unfurl the awning, but leave the legs locked into their holding clamps on the side of the camper. That made getting to the top of the awning difficult, and all but impossible to have enough leverage to exert any force to clean hard-to-remove stains. Then I realized I could remove the legs from their clamps and slide them under the camper, that way the awning hung flat against the wall of the RV. I could not only reach all of it, but the wall behind it gave me something hard to press against when scrubbing with a sponge and Thetford Awning Cleaner. Once again, rinse off the soap, then put the legs back into their clamps so you can clean and rinse the underside.
Cleaning the tires and rims gives me a chance to inspect them for splits, cracks and weatherization damage. Same thing with the tongue and hitch, although I don’t clean the underside of the camper as much as inspect it for damage and such.
Finally, the last things I clean are the windows. Nothing major here, just a spray bottle of window cleaner and some paper towels.
See you next week when we talk about How to: Clean the Interior of your RV.
Rick Kessler
(Gr8LakesCamper)
Gr8LakesCamper celebrates the world of RV Camping in the Great Lakes region. Gather around the campfire and share tips, ideas and stories on RVing, camping and travel destinations. Follow Gr8LakesCamper on Twitter, Facebook, Pinterest and the Gr8LakesCamper blog.
